
What this is
Start ProEX, log in with the right account and share examinations in a Vision call.
Who it's for
Anyone conducting clinical examinations with ProEX on a virtual care station or their own device.
About ProEX
The ProEX software is installed on your tablet or computer. It’s designed to collect, store, and share patient data from various clinical peripherals connected via Bluetooth® and USB. It allows healthcare professionals to conduct in-depth clinical consultations by bringing multiple devices into an examination. The data collected, including images, videos, audio and readings from devices High Definition Cameras (wound, dermatology, intraoral), Vital sign monitors (temperature, blood pressure, pulse oximetry), Advanced devices (ECG, digital stethoscopes, otoscopes, ultrasound probes), can be saved against a patient record, shared over a virtual care call, and integrated into an Electronic Health Record (EHR) system.
 You can access the ProEX Software from the desktop shortcut. It can be used stand-alone, or in conjunction with other platforms such as healthdirect Video Call. Learn more on our support page: visionflex.com/support
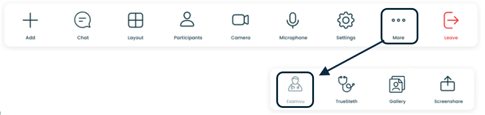
In a Vision call you can click the ExamVu button on the toolbar to start ProEX clinical exam software and share it with all participants.
When you minimise ProEX it will appear as a blank white box, in privacy mode.
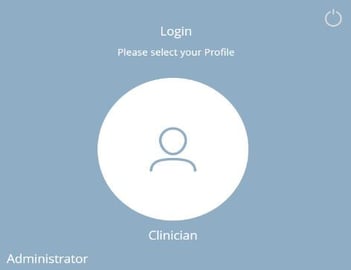
If it’s your first time logging in, click Administrator and enter the default passcode 1234. You’ll be prompted to set a strong password. The Administrator account is only used for managing accounts and configuring the ProEX software.
Log in using the Clinician account. You can rename this account in Settings >, Accounts.
From the Home Screen you can access all areas of the software.
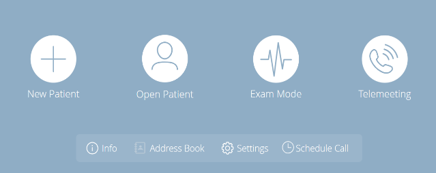
You can create a New Patient profile, enter the patient details and then Create Session to begin.
Open Patient to view a list of existing patient profiles.
Enter Exam Mode. You will be able capture data, review, share and save against a new or existing patient.
Start a Telemeeting to connect directly to your Vision Virtual Meeting Room (VMR) from within ProEX. This feature doesn’t require the Vision website to be open at the same time.
View Info about your software license, software version, and how to contact Visionflex support.
Schedule a call using Vision telemeeting and send an invitation from within ProEX.
ProEX Exam Mode
 Exam Mode is used to collect, store, and share patient data from clinical peripherals that are connected via Bluetooth® and USB. The peripherals that shipped with your Virtual Care Cart are paired and ready for use.
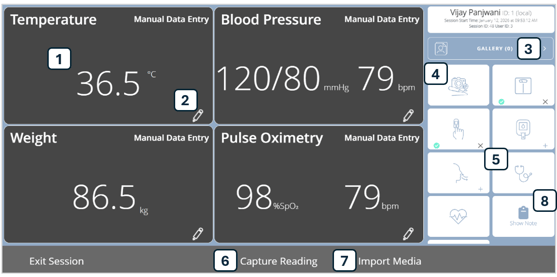
Commence an examination with one or more clinical peripherals and the results will appear in Exam Mode.
- When the reading has registered it will appear in this view.
- You can manually enter a value.
- Captured Observations, images and video will be sent to the Gallery where they can be saved to a session against a patient
- View, save and share vision from clinical cameras such as an Otoscope, Dental Camera, General Exam Camera and other scopes.
- Customise the Exam Mode view by selecting (+) or removing (x) an Observation. Or click the tile to focus on one.
- Capture Observation data to the Gallery.
- Import Media into the session, including images, PDFs, audio and video clips.
- Show note to add a session note.
Using Clinical Cameras in Exam Mode
Use Camera Mode to take snapshots, record and stream vision from connected cameras and scopes, such as the GEIS General Exam Camera and the Otoscope.
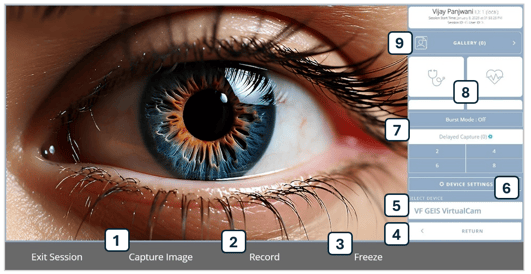
- Capture an image to the Gallery.
- Record a video to the Gallery.
- Freeze the video feed.
- Return to Exam Mode.
- Select the desired camera. “VF GEIS VirtualCam” will allow you to use the button on the GEIS camera to capture an image.
- Device Settings allows you to set the default device (by moving it up the list) and specifying which cameras should appear as diagnostic cameras.
- Burst Mode and Delayed Capture can assist with capturing an image when the patient is not close to the computer. Burst Mode will take a series of photos. Delayed Capture will pause the set time before capturing.
- Switch between Exam Modes quickly or scroll down to add a Session Note.
- View the Gallery to see media and readings that have been captured but not yet saved. Use this view to review and remove or add items as desired.
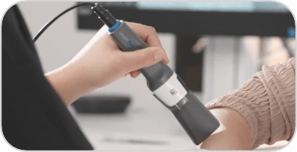
The GEIS General Exam Camera
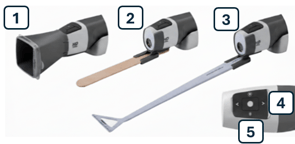
The General Exam Camera is designed for close-range imaging and has powerful LED illumination for consistent image colour and tone.
It comes with clip-on accessories for different functions.
|
|
The SyncVision Otoscope
The digital otoscope simplifies ear, nose and throat examinations.
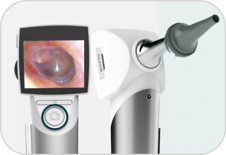 Connect the USB-C cable to the Otoscope handle, then press the round camera button on the device to select “PC Cam”.
When Windows has detected the camera, open Exam Mode, Camera
The dial on the side of the screen adjust the light-throw distance for ear canal or ear drum examination.
Usin the Handheld ECG in Exam Mode
Click the ECG tile in Exam Mode to connect to the ECG device.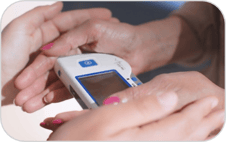
Press the small round power button on the top of the device for 3 seconds to turn it on.
Direct the patient to hold the ECG device between their palms or fingers so the metal contacts are covered. If they are unsteady, you can cup their hands without interfering with the signal.
Press the play button on the front of the device to commence the examination.
The ECG will calibrate for 10 seconds then commence a 30 second trace.
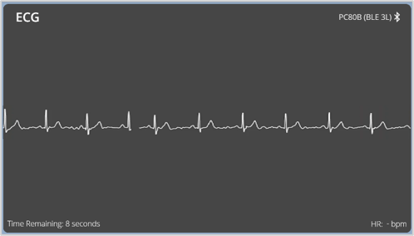
You can see the Time Remaining as the trace is underway.
When the trace is complete, click Capture Reading to save it to the Gallery.
Patient Data in ProEX
 From the Home Screen click Open Patient to see a list of all of the patients with stored records.
You can search for records and view basic information. Click on a Patient to view their session history.
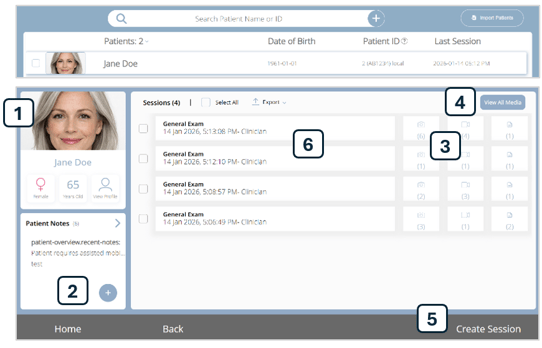
- Patient demographics are shown here. Click View Profile to edit their information.
You can upload an image or capture one using a connected camera. - Patient Notes can be added and edited to provide an overview.
- Data types are listed to show media and notes.
- Click View All Media to see a view of all media for easy side-by side comparison.
- Click Create Session to begin a new Exam.
- Sessions are listed chronologically.
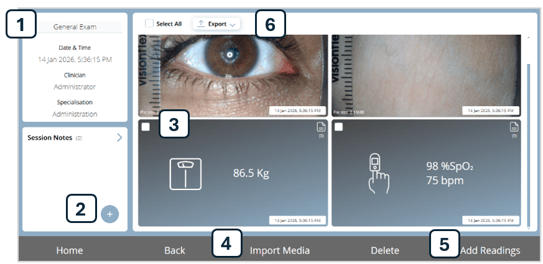
- Session information is shown here.
- You can add a Session Note.
- Click the tick box to select items to delete or export.
- You can Import Media to add images, audio and video to the Session.
- You can also Add Readings for Vitals.
- Export individual items to a desktop folder or USB.
Generating a PDF report from one or more sessions
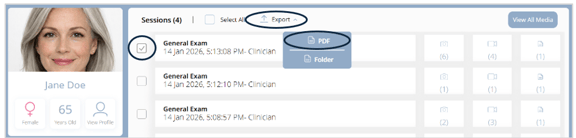
Open a Patient record and select one or more of the tick boxes next to the session.
Click Export to PDF and a .pdf file will be saved to the C:\Users\Desktop\ProEX folder.
If you’d prefer to select where to save the file you can toggle the setting called “Disable USB Export” in Settings > Configuration > Usability.
The exported PDF file can be printed and filed, emailed to the doctor or uploaded into your Electronic Health Record. 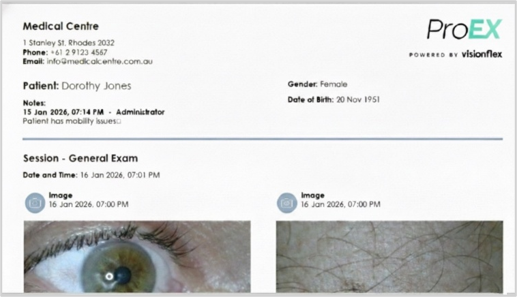
Need help?
Call 02 8914 4000 | Email support@visionflex.com | Visit visionflex.com/support
Visionflex acknowledges the Traditional Custodians of Country throughout Australia and their continuing connection to land, sea and community. We pay our respects to Elders past and present.