
What this is
How to conduct a stethoscope examination with TrueSteth, transmitting heart, lung and body sounds to the far-end doctor over a Vision call.
Who it's for
Anyone using a digital stethoscope with Vision, on any virtual care station or their own device.
Before you start
TrueSteth allows the transmission of heart, lung, and body sounds from a Digital Stethoscope over a virtual care call. The remote physician can control the filters and the gain of the stethoscope to assist with diagnosis.
 Audio settings guide: Use the Pre Session Checklist to confirm your microphone and speaker settings are correct before starting your session. Find it on visionflex.com/support.
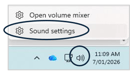
To carry out a TrueSteth examination, first connect the digital stethoscope via USB. The Stethoscope is seen by Windows as a Microphone. Check the Audio Settings by right-clicking the Windows volume icon and opening Sound Settings to ensure that the volume of the ri-sonic PCP-USB Stethoscope set to around 80%.
 Your Stethoscope came with ‘over ear’ headphones to get the best audio quality during the stethoscope examination. If headphones are not used, feedback can be an issue, and some audio indicators will be difficult to detect. Turn them on by pressing the centre button of the 3 raised buttons on the headphones.
 TrueSteth is accessed via the Vision toolbar.
Select your headphones by clicking the ^ up arrow next Preview and select the Headphones device.
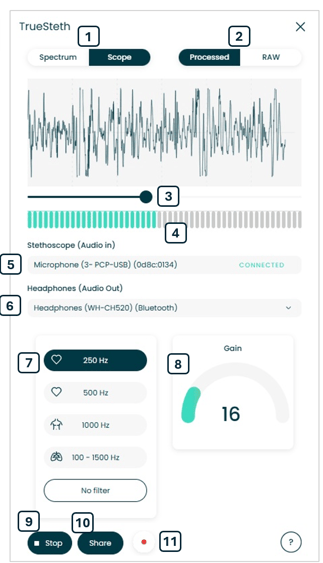
- Select the graphical display mode to switch between the Spectrum for the frequency range and Scope for a progressive audio trace.
- Switch between rocessed audio and the Raw, unfiltered audio from the stethoscope.
- Drag the diamond to extend or reduce the time base.
- Volume meter shows the amplitude of the audio.
- Drop down to select the stethoscope for Audio In.
- Drop down to choose the headphones for Audio Out. If they aren’t listed, power them on then reload TrueSteth.
- Filters are selected based on the type of examination. 250Hz and 500Hz low frequency for heart sounds, 1000 Hz for heart valve clicks, and body sounds and a wide filter to focus on lungs and airway.
- Adjust the Gain of the stethoscope to amplify audio. Avoid over-amplifying where the scope shows “clipping”.
- Start / Stop the audio feed on your end.
- Once the stethoscope is connected and you have verified the volume, you can Share an invitation to other participants in the virtual care call to view the TrueSteth application and hear the audio feed. When the participants ‘accept’ the invite message on their screens they will see the TrueSteth application and have full control of the stethoscope and the options listed above.
- Record the audio stream. When you Stop the recording, it will be downloaded as a .wav file to Downloads folder on the computer.
Need help?
Call 02 8914 4000 | Email support@visionflex.com | Visit visionflex.com/support
Visionflex acknowledges the Traditional Custodians of Country throughout Australia and their continuing connection to land, sea and community. We pay our respects to Elders past and present